You might think eco-printing sounds like something from WALL-E, but it’s very much of this earth. Popular techniques for printing on fabrics today often involve the use of harsh chemicals detrimental to your body and the planet. Eco-printing fabrics go in the opposite direction; so what exactly is eco-printing?
Eco-printing fabric, otherwise known as botanical printing or eco-dyeing, is a technique that uses natural materials such as leaves, flowers, pinecones, and bark to imprint natural colors and shapes onto fabric. This type of printing is not only fun but environmentally friendly as well.
The best part is that eco-printing is simple and affordable to do. If you want to know how to use nature to design beautifully unique scarves, t-shirts, or any other garment, then you’ll love this guide.
Beginners Guide to Eco-Printing Fabric in 5 Stages
Eco-printing fabric is so simple that it can be done in 5 stages. Now, there are many different ways to eco-print, and each method has quite a few steps within them, but in general they all follow the same process.
The 5 stages of eco-printing fabrics include:
- Preparing supplies and collecting natural materials
- Mordant the fabric
- Arrange your natural materials
- Fold and roll the fabric with natural dyes
- Wait then hang to dry
We told you it was simple! If you’re chomping at the bit to get started, we have a complete tutorial on eco-printing fabrics, filled with several techniques, and visuals to guide you through 30+ steps. Here’s a look at what you’ll make in the tutorial.
Now then, let’s go over the 5 stages of eco-printing fabrics so you can know what you’re getting into.
1. Prepare Your Supplies and Collect Natural Materials
This stage is all about gathering your supplies in one place and collecting natural materials to use as dyes or prints (textures.)
You’ll want to make sure you have fabric (silk, cotton, linen), mordants (like alum, iron, copper sulfate, stainless steal), leaves and flowers from your garden, a large pot (for steaming), and objects to imprint onto the fabric.
Once you have everything, then you can begin collecting natural materials like leaves, flowers, bark, etc.
What Do You Need to Eco-Print Fabrics?
To make a basic eco-print, you’re going to want a few specific materials. If you’re looking for a shopping list, we’ve prepared a full list of eco-printing supplies used by New Hobby Box and where you can get them in a separate article.
If you’re just window shopping or trying to get a general idea of items you’ll need, here’s what you’ll need to eco-print on fabrics.
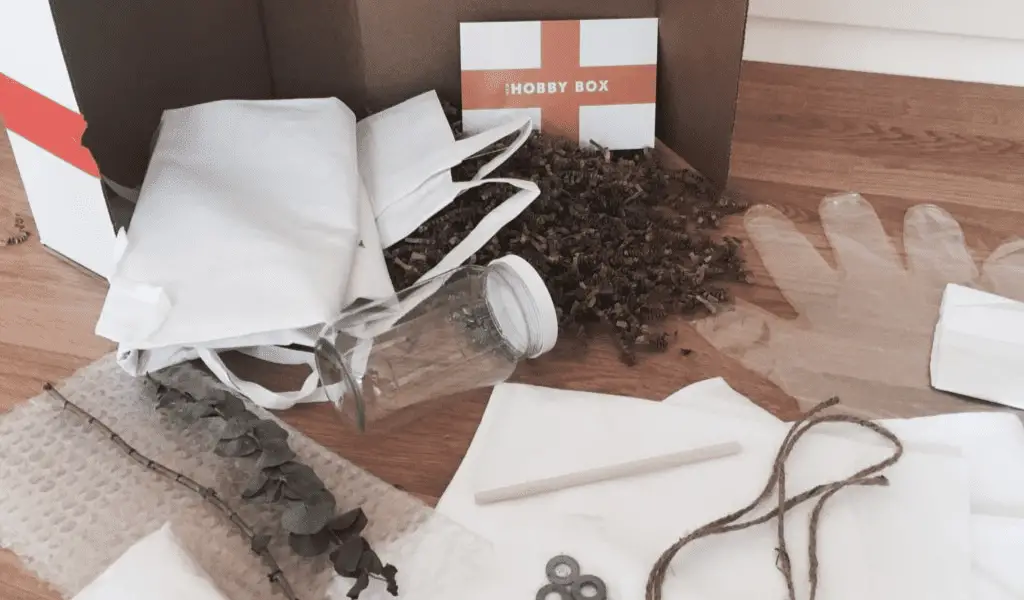
Eco-Printing Fabric Supplies:
- Apron: We use a plastic apron for part of the process, primarily when we’re rinsing dyes out of the fabric, then we use a canvas or rubber apron for all the other stages.
- Bowl: You’ll mix alum in water in this bowl, which is the adhering agent for dyes to canvas. More on that in the materials section.
- Stirring Utensil: Nothing fancy here, just use a spoon or chopsticks – this will be for mixing the alum and water and for pulling hot fabrics out of boiling pots of water. Don’t worry about chemicals affecting the spoons you normally eat from – you’ll use food-grade alum which is perfectly safe and natural if consumed.
- Jar With Lid: This is optional, but we like to incorporate rust dyeing into our eco-printing process. This means dropping some washers, screws, and nuts into a jar with water and letting it sit for a few days. The rust byproduct makes for a cool patina on the natural materials we ultimately print with.
- Dowel Rod: We have a million dowel rods lying around since hobbies are kind of our thing, but you can use just about anything cylindrical for this part – a wooden stick, broom handle, wine bottle – it doesn’t matter what the object is exactly. You’ll use this to roll your fabric for bundling.
- Stove and Large Pot: To mordant a fabric, you need to use heat and water to get the alum to adhere to the fabric. That’s why we use a stove and a large pot for this part of the process. A stainless steel pot is great for eco-printing since it’s dye resistant.
Eco-Printing Fabrics Materials:
- Plastic Gloves: These can be disposable (nitrate preferred) or the rubber latex type you would use to wash dishes.
- Sheet of Plastic: You can get scrappy with this – use a plastic sheet, trash bag, plastic tablecloth, or even a plastic apron like we use. This plastic sheet is called a resistor, and it’s used in some eco-printing techniques as a barrier between your materials and the fabric when you roll them up. The plastic will prevent the materials from printing on two sides of the fabric.
- 100% Unbleached Cotton Fabrics: Go organic on this, and if you’re looking to save some money here opt for muslin fabrics. They’re woven looser than standard cotton and typically cheaper as a result. The fabric you choose here, whether it’s a textile or a garment, will ultimately be the structure of your final product. So choose something you like, such as a scarf, t-shirt, or handkerchief square. Unbleached is super important too! You don’t want any treatments or chemicals on your item, which is why organic is usually the best option as well.
- Metal Hardware and Fasteners: Bolts, nuts, screws, washers, etc. It doesn’t matter what type of fastener or hardware you pick, you just want something that will rust when placed in your jar of water. Pick a metal that corrodes in water anything with iron will get the job done. Avoid copper or bronze – they won’t rust.
- Alum: We use alum for most of our eco-prints, which is the active agent for mordant. This is all just fancy chemistry language for a powder that helps the colors adhere to the fabric and stay on the fabric. Alum is natural, food grade, and inert so don’t worry about having it around for everyday use. For every fabric you decide to dye, you’ll need to measure out 10%-15% of the dry good’s weight in alum alone. This means if your garment weighed 100 ounces in a dry state, you would need between 10 to 15 ounces of alum.
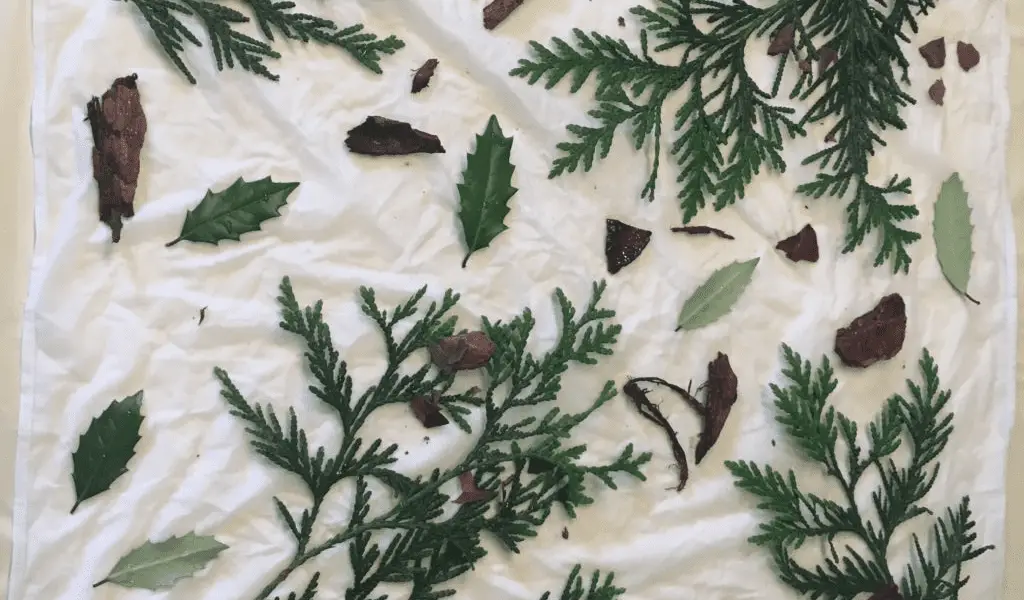
- Natural Dye Materials: Leaves, flowers, bark, bugs, etc. for your designs – you can grab things from the store or online, but in general, you should just be able to go outside and forage for colors and shapes that speak to your creative vision.
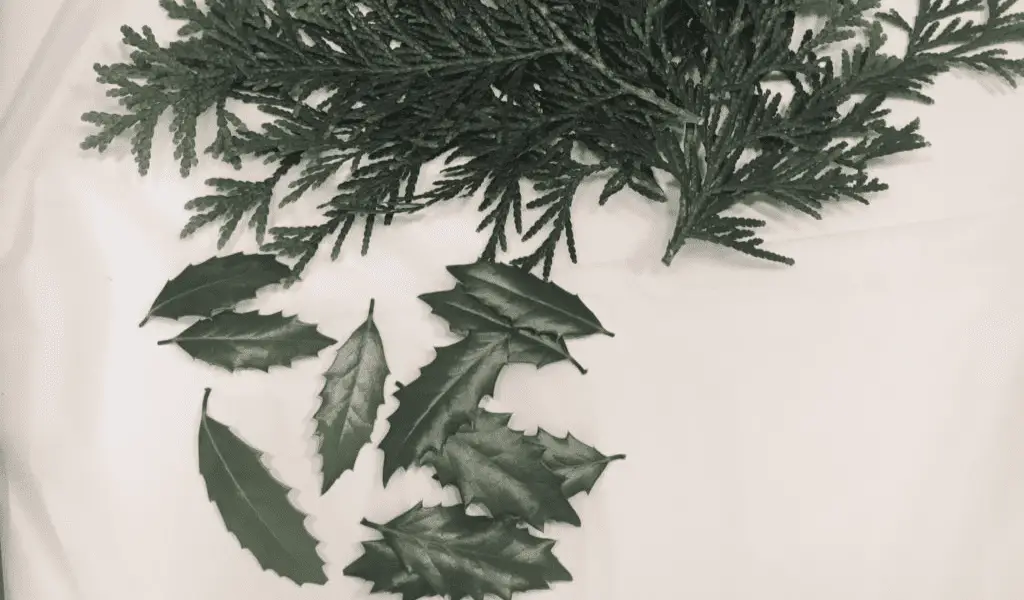
Choose Your Dye Materials
Leaves, flowers, bark, bugs, etc. will all be great for your eco-printing designs. You can grab things from the store or online, but in general, you should just be able to go outside and forage for colors and shapes that speak to your creative vision.
Different plants will leave different shapes and impressions on the final product. This guide is a great resource to see what colors different plants will make.
Finding the right eco-material to make your print with is great fun, so get creative!
2. Mordant the Fabric
Mordanting the fabric you’re planning on printing will make your eco-prints resistant to fading from both sunlight and washing. This is referred to as color-fastness.
Mordanting is a process of pre-treating the fabric with a substance that will allow for better bonding between the fibers and the color pigments found in plants.
The most commonly used mordant is alum, which is what we use for nearly all of our eco-printing projects, but other materials such as iron or tannic acid can also be used.
Not all eco-printing methods or materials require mordant (copper, brass, or iron pans will mordant fabric on their own). Which is pretty incredible. Even though we own a copper pot that’s big enough for our eco-printing projects, we still use alum.
That’s because each mordant has a different effect on the color, where some saturate or desaturate more than others. Alum, in our experience and methodology, gives the most saturated look to eco-printing.
Copper on the other hand is considered a saddening mordant since it desaturates colors and gives them a darker look than some other mordant alternatives.
With any mordant, it’s important to make sure that the fabric is completely saturated and left to sit for 1-2 hours before rinsing. This ensures an even bonding between the mordant and the fibers of the fabric.
For the purpose of introducing you to mordant, let’s assume you’ll use alum, as such, here are the steps required to mordant fabric:
- Measure out the alum you need and dissolve it in a bowl of warm water.
- As an optional step, take some metal fasteners and put them in the plastic container in some water, and close the lid. After a few days, you’ll notice their corrosion and start to see rust accumulate as a layer on top of the water.
- Boil a pot of water.
- Add the dissolved alum/water into the pot and mix thoroughly.
- Add the fabric you want to use in the project to the pot, then turn the heat off.
- Let the fabric you chose sit in the water for 1 to 2 hours, or until it is cool enough to take out.
- Remove the fabric from the pot and lay it out.
- Gently squeeze out excess water, with emphasis on gentleness. Also, don’t rinse the shirt with cold water, as it will ruin the effectiveness of the mordant.
3. Arrange Your Dye Materials
With your fabric laid out and chocked full of alum, it’s now time to arrange the natural materials you’ve collected onto the fabric.
How and where you place things will ultimately impact the color and pattern of your fabric. So treat this step like you’re creating a collage. Where do you want certain colors and shapes on your work of art?
At this stage you’ll want to throw some gloves on and grab your jar of rusty water. You’ll then pour the corroded water into a bowl while still leaving the metal bits in the jar as you pour. Fill the bowl halfway, and be sure to refill your jar with water so you can create more rust for future eco-dyeing projects.
You would then dip any of the natural materials, such as leaves or pine cones, into the rust water, and then place them back on the textile.
If you decide that you only want to print to one side of the fabric, then you’ll need to grab a plastic sheet. Remember, this can be a plastic tablecloth, garbage bag, or any sort of sheet material impermeable to water.
Once all your items are laid out where you want them on the fabric, this is the step where you would cut your plastic sheet to size of your fabric and lay it flat over your dye materials and fabric.
This is plastic sheet is referred to as a “resistor”, and its purpose is to prevent your design from showing up on both sides of your chosen print fabric. If you want your design on both sides, you can skip the plastic sheet altogether.
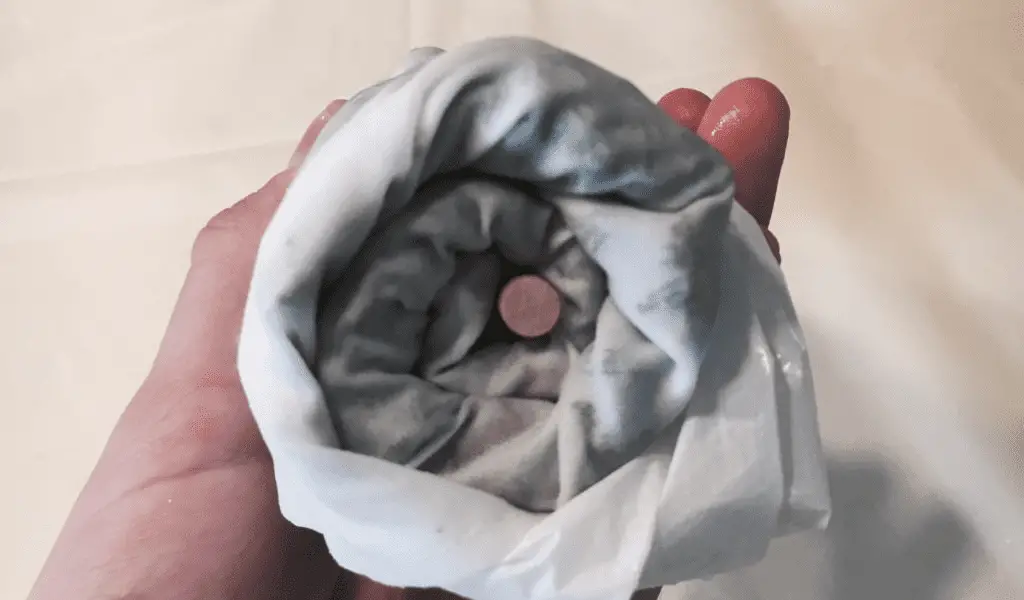
4. Fold and Roll
This is the easy part, whether you decide to use a resistor or not. You simply take your fabric (with or without the resistor) with materials and all and begin folding in halves.
The amount of times you’ll need to fold is dependent on the size of your dowel rod and the fabric you’re working with, but in general it’s not a game of counting how many folds you can do.
What you’re looking for is that your folds maximize the surface area of the materials inside touching the fabric so they fully saturate the textile.This means all your natural items touching the fabric should be as flat and tight to the fabric as possible.
You’ll most likely end up with a folded rectangular shape that is either a quarter or an eighth of its original size.
After it passes your inspection, you’ll then grab your dowel rod or cylindrical alternative and place it at the edge of one of the shorter ends of your rectangular shape. If your shape ends up a square, any edge will do.
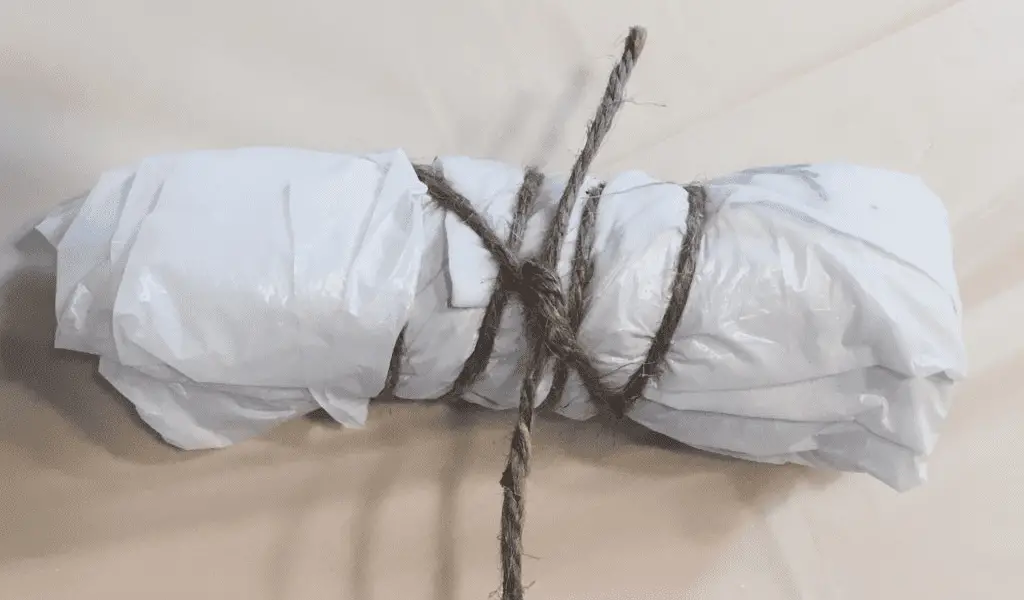
Next, you begin rolling the the fabric around the dowel rod as tight as possible creating a bundle at the final edge. Using jute rope or natural twine, you would then bind the fabric to the dowel rod, keeping this cylindrical shape of fabric intact.
5. Wait, Then Dry
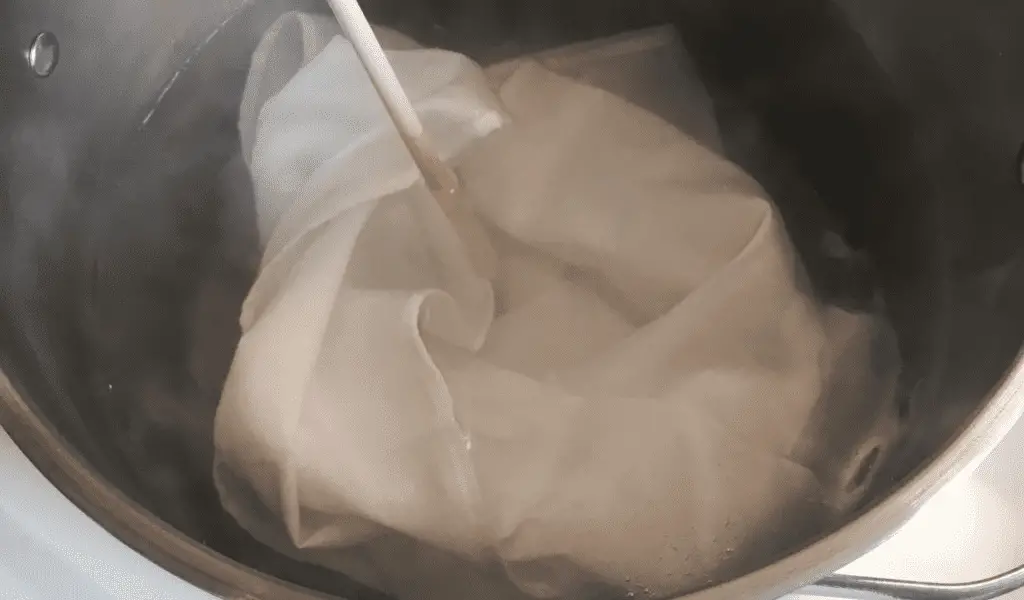
At this point, it’s time to let the dyes work their magic. It can be difficult to resist the urge, but it’s best to let the bundle sit for 24-48 hours. Some techniques incorporate steaming the bundle to speed up the process.
This is done by adding a little water into a pot, bringing it to a boil, and placing the bundle inside with a lid on top. This will create enough steam to allow the dyes to soak into and bind with the fabric quicker.
This part of the process is fascinating because it’s open to a lot of experimentation, where different temperatures, liquids, and durations allow you to test ideas out, each with unique results. It’s part of the fun of the hobby!
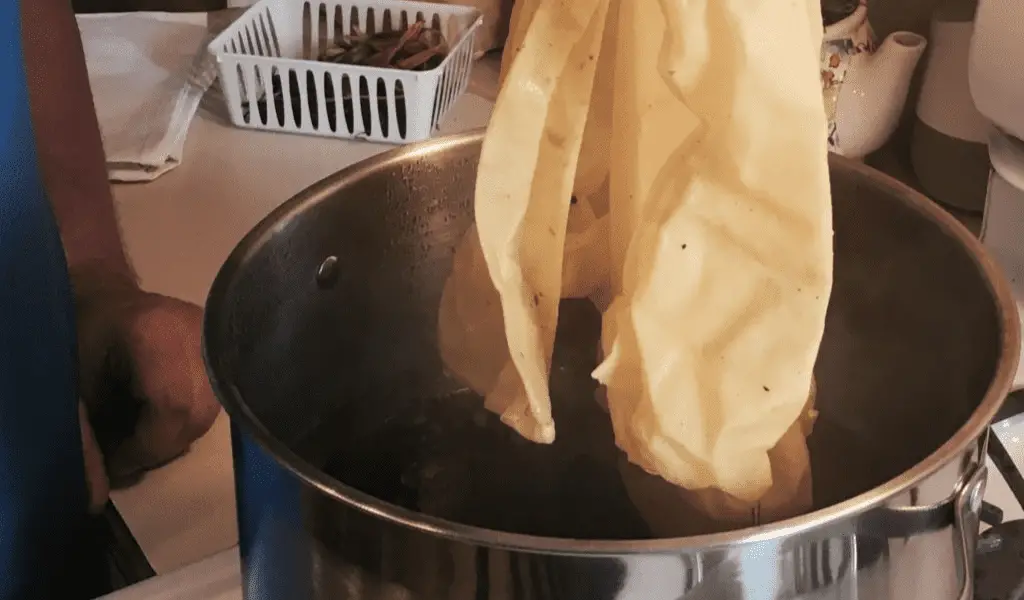
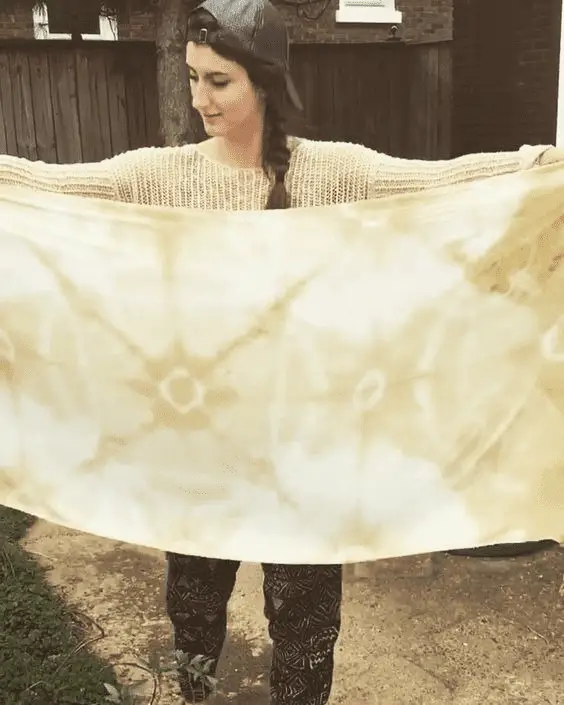
One thing to note is that if you do place the bundle back in the pot in boiling water, you can take the opportunity to dye the whole thing by placing dye material in the water. The image above shows you the peaceful yellow achieved when you place a fabric bundle and eucalyptus in a boiling steambath.
There’s also a technique you can incorporate here that’s therapeutic – some people choose to hit their bundle with a hammer to get the dyes out, which works great for things like bark and nuts (that’s right, you really can use nearly anything natural as a dye material).
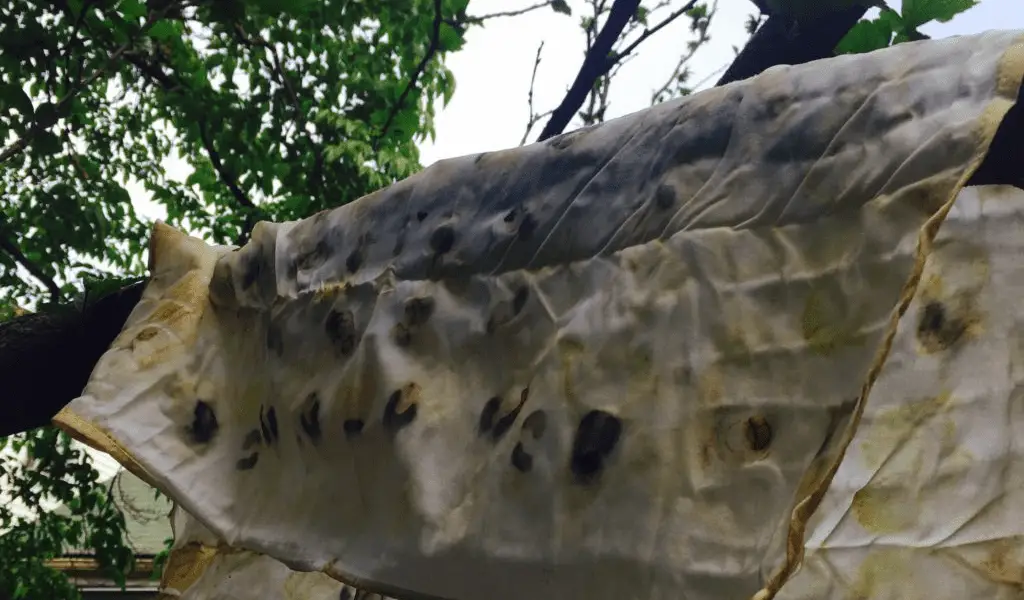
Once you’re done with all the above steps, all that’s left to do is to let your eco-print dry outside or hang in an average temperature climate for a day, and then it is ready to go!
Can You Wash Eco-Printed Fabric?
You can wash eco-printed fabric, but like all dyed fabrics, the color saturation will eventually fade from sun exposure and cumulative wash cycles. You can wash eco-printed fabrics in a washing machine, but this will speed up the fading effects. To make eco-printed fabrics last longer, wash by hand using mild detergents.
You put so much work and creativity into your eco-printed fabric, so it’s only natural to wonder how to take care of it properly. Eco-printed fabrics tend to fade quicker than other dyeing techniques, so caring for them by hand is a great way to sustain the beauty of your fiber art.
Make sure to dry your eco-prints somewhere out of the sun, as the UV rays from the sun can cause some serious degradation. It’s always best to air dry rather than use a machine dryer.
Ready to Start Eco-Printing Fabrics?
Eco-printing is one of the most rewarding ways to craft textiles. Its results are often unpredictable, making it a beautiful and exciting entry into the world of eco-friendly dyeing.
It’s very versatile and easy to learn, so if you’ve been curious about getting involved in a new textile creation method, eco-printing is a great place to start, and there’s no better tutorial to begin your journey with than New Hobby Box’s eco-printing guide for beginners.
There are so many different objects that you can use as dye sources, and the results have so much potential to be creative and innovative, so why not give it a try! Who knows; you might just find your new passion in this process. Good luck!